Difficulty
Easy
Steps
8
Time Required
- Connect 2 Arduinos via radio 8 steps

In Progress
This guide is currently being written. Reload periodically to see the latest changes.

User-Contributed Guide
This guide is not managed by the site's staff.
Quiz
0
Introduction
Much of the information for this guide, including some diagrams, were taken from this tutorial https://www.allaboutcircuits.com/project...
Note that you'll need the Arduino IDE installed on your computer (potentially two computers) to do this guide. Look here for Windows or here for Mac if you need help installing the IDE.
Tools
No tools specified.
-
-
Wire each of your Arduinos as shown, using 7 male-to-female jumper cables. You'll be putting the female ends on the NRF chip pinheads, and putting the male ends in the Arduino.
-
Different colored cables not necessary but highly recommended if you value your sanity.
-
-
-
Download these libraries. They contain code that will make it easier to operate the radio, as well as an example sketch we will use later.
-
To install the libraries, got to Sketch > Add .ZIP Library in your Arduino IDE and navigate to and select the archive folder you downloaded from the link above.
-
-
-
For bonus impressiveness, repeat the previous step for second computer, preferably in another room, and complete all subsequent steps twice on two separate computers UNLESS OTHERWISE NOTED.
-
If you choose not to do this, you'll need to repeat all the subsequent steps twice on two different instances of your Arduino IDE UNLESS OTHERWISE NOTED. This means that you will need to click the Arduino IDE icon in your start menu or desktop twice. You can't just open a new window.
-
Either way, your Arduinos will be communicating over the air, but it's certainly cooler if they're not both connected to the same computer.
-
-
-
Open the "GettingStarted" sketch under File > Examples > RF24 (You may have to scroll down a ways).
-
Change line 16 so it reads "RF24 radio(9,10);" (9,10 correspond to the orange and white wires respectively, as shown in the diagram, or to pins 3 and 4 on the radio chip).
-
If necessary, check "Display Line Numbers" in File > Preferences (which for some stupid reason is not enabled by default).
-
-
-
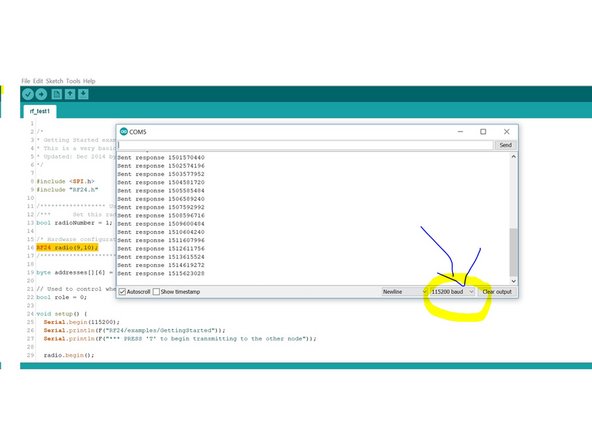
Go to the upper-right hand corner of the IDE and click on the little magnifying glass. This will open a terminal window.
-
The terminal is called "Serial Monitor". There is a setting in the lower-right hand corner of this window called "baud" (as shown). This stands for bits per second. (Don't ask me why!)
-
Your baud is probably at 9600 now, by default. Whatever it is, change it to 115200.
-
If you're curious, watch what happens when you set the baud to something else. It's kind of cool!
-
-
-
Watch the magic happen! Those messages in the terminal are actual information that the Arduinos are sending to each other across the room. For bonus points, try getting them to send text of your own choosing! Useful for sending secret messages to your pals.
-
If nothing is working, I can't really help you at this point. Either do your best to troubleshoot or curl into a ball and cry (OR ask for help!!! A frequently overlooked option).
-