
Difficulty
Very easy
Steps
9
Time Required
04:00:00

In Progress
This guide is currently being written. Reload periodically to see the latest changes.

User-Contributed Guide
This guide is not managed by the site's staff.
Quiz
0
Introduction
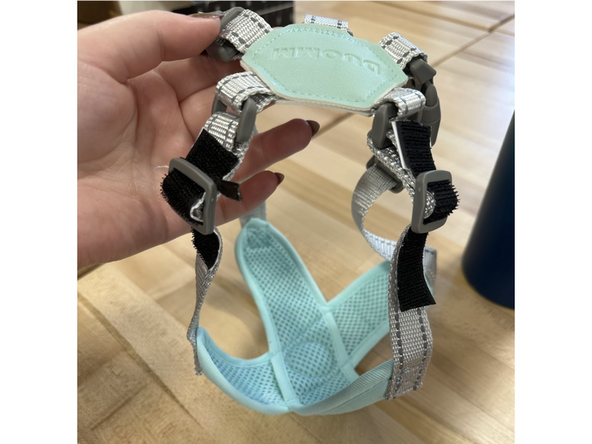
Do you feel unsafe letting your visually impaired dog walk around on their own? This may be the solution for you! Our product helps to reduce your anxiety and increase your dog’s independence as they will be able to move in a safe way. This product minimizes injuries by creating a barrier for your dog, warning them of obstacles in their path as a walking stick would for a human. We went through numerous testing to ensure that this product alleviates the difficulties visually impaired dogs go through in their day to day lives without causing harm. We increased the comfortability of the halo as well, to make sure that you and your dog feel safe wearing our product.
-
-
To begin this project gather the following materials:
-
A Harness —we recommend purchasing the one at this LINK for the best results
-
Double-sided velcro —you may use any double-sided velcro as you deem safe, but for our primary design we used THIS
-
TPU 95a Filament —based on our research we found that TPU 95a was the best material for this project to maximize the dog’s safety
-
Measuring Tape —our design is customizable so have a measuring tape at hand to measure your dog and scale this to fit
-
-
-
The tools you need to assemble the device:
-
A 3D Printer that can print a device large enough for your dog's needs
-
Scissors that can cut through velcro
-
-
-
Now that you have downloaded the open source guide, you will need to measure the following parts:
-
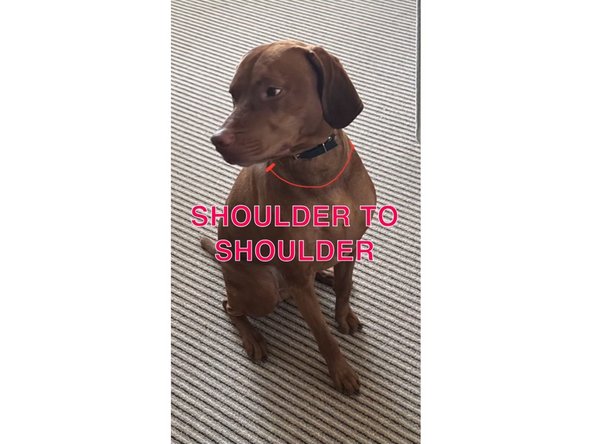
Shoulder to Shoulder: Use the measuring tape to calculate the length from shoulder to shoulder. This corresponds to the parametric called ‘shoulder_to_shoulder’ on the CAD model.
-
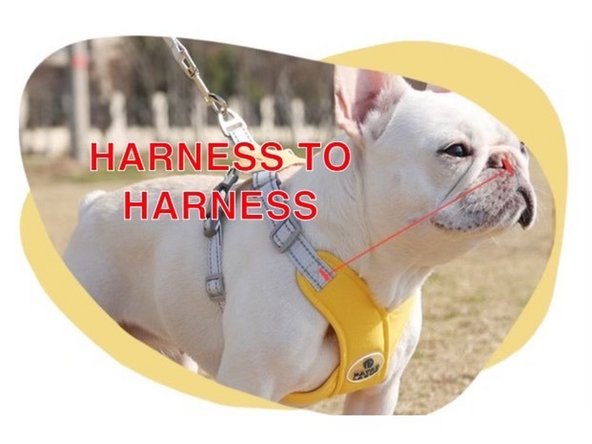
Harness to Nose: Measure the length from your dog's harness to the tip of their nose. This value will be multiplied by 2 and summed with 5mm - 7mm to get the measurement (or as desired—the added mm's are how far away the halo will be from your dog's face). On the CAD model, this corresponds to the parametric called ‘harness_to_nose’.
-
-
-
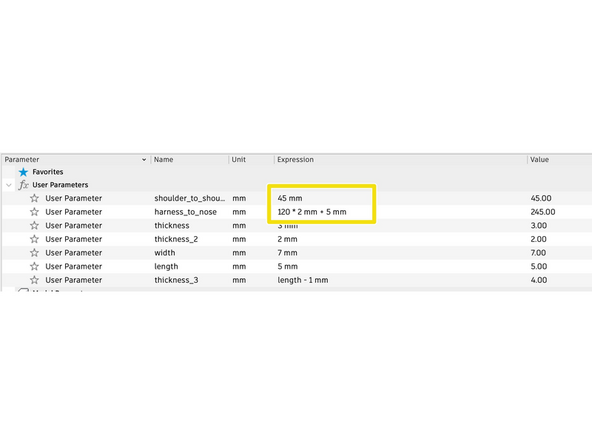
Open the CAD model in Fusion 360, select the dropdown menu 'Modify', then select 'Change Parameters'.
-
Replace the current measurements with the values you have calculated to customize the design for your dog.
-
The 'shoulder to shoulder' measurement correlates to the 'shoulder_to_shoulder' parameter.
-
The 'harness to nose' measurement correlates to the 'harness_to_nose' parameter. You can insert your calculated value here, or replace '120' with the measurement of your dog.
-
-
-
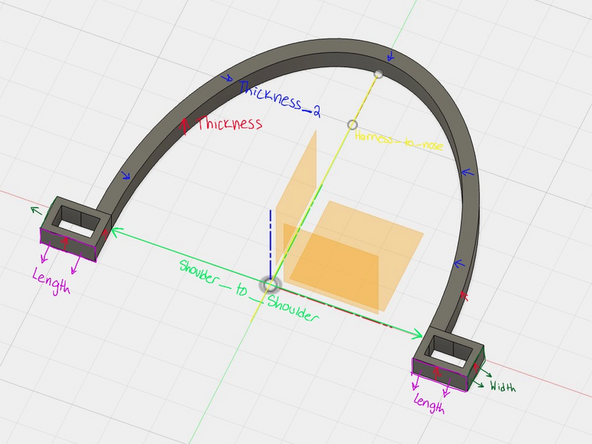
'thickness': Height of whole piece. You can change this measurement to increase / decrease the height of the Dog Halo which can change the durability of the object.
-
'thickness_2': Wideness of tube. Changing this measurement would increase / decrease the width of the Dog Halo, also affecting the durability. We recommend you increase this along with 'thickness' if you are printing this for a larger sized dog
-
'width': Wideness of the velcro attachment slot.
-
'length': Length of the velcro attachment slot.
-
-
-
This design is parametric, so you can open it with Autodesk Fusion to create any changes to the parametric sizing to better fit your dog.
-
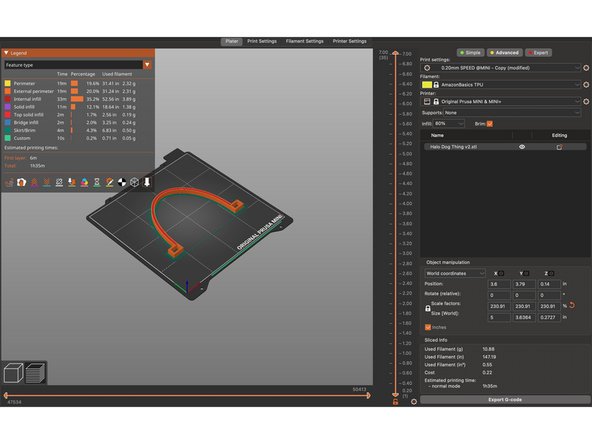
Once it is sized for the desired fit, export the file to whichever slicing software your printer uses
-
We used PrusaSlicer and a Prusa MINI+, however that was just for prototyping and the 7" printing radius may be too small for your dog.
-
We recommend having a brim because the halo tends to detach from the plate
-
Remember to make sure that the correct filament (TPU) is stated in the 'Filament' section, and that you edit the 'Fill Density' to be 25%
-
-
-
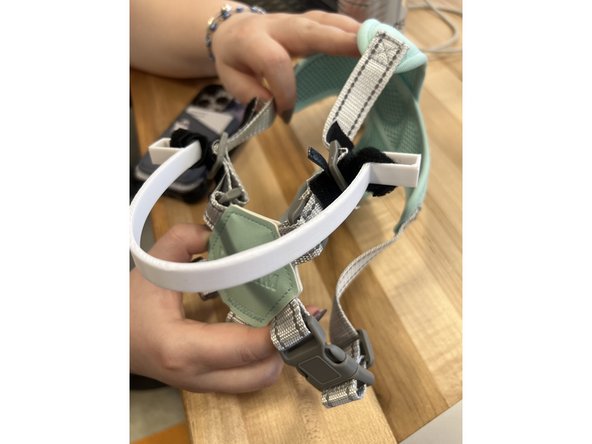
Begin the assembly process by tying the soft side of velcro to square on both sides. Make sure that the velcro “faces” inside the halo.
-
Then adhere the rough side of the velcro to the straps on the harness based on desired fit.
-
-
-
Make sure the size of the device is large enough that it effectively blocks your dog from running into obstacles
-
Feel free to reprint the device or adjust the location and amount of velcro used to increase stability and comfort
-
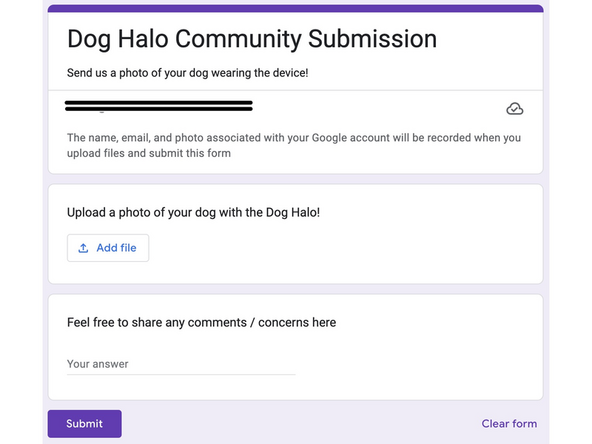
Send us a photo of your dog wearing this device or share any comment / concerns with us HERE!
-

Cancel: I did not complete this guide.
One other person completed this guide.