Difficulty
Easy
Steps
9
Time Required
00:15:00

User-Contributed Guide
This guide is not managed by the site's staff.
Quiz
0
-
-
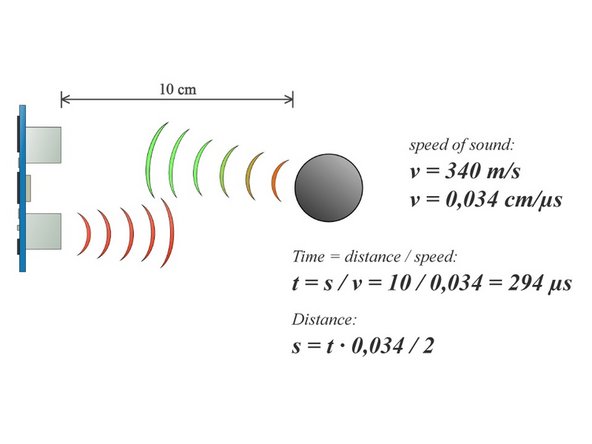
1) The transmitter sends a signal
-
2) The signal bounces off of an object
-
3) The reflected signal is absorbed by the receiver
-
4)The written code makes a calculation for the distance between the sensor and object using the speed of sound and time passed
-
-
-
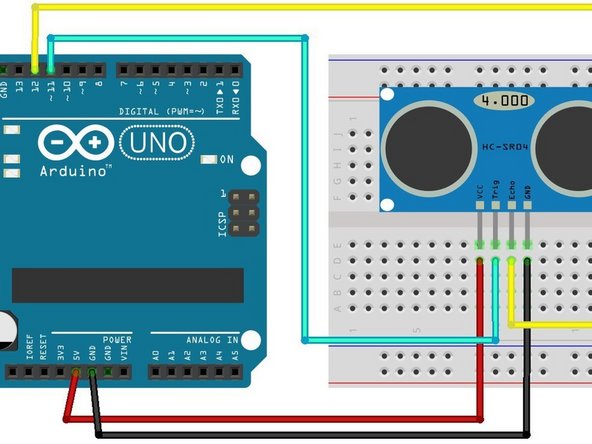
Jumper wires connect the ultrasonic sensor, HC-SR04, to the arduino
-
On HC-SR04, the VCC (red) connects to 5V on the Arduino via jumper wire
-
On HC-SR04, the Trig/input (teal) connects to pinmode 11 on the Arduino via jumper wire
-
On HC-SR04, the Echo/output (yellow) connects to pinmode 12 on the Arduino via jumper wire
-
On HC-SR04, the GND (black) connects to the GND on the Arduino via jumper wire
-
-
-
At the tippity top of the code before the set-up or Serial.begin(9600) is where variables are defined. They need to be defined so when they are in a function, the computer will know what the variables means. The variables necessary for this sensor are...
-
const int trigPin=11;
-
const int echoPin=12;
-
long duration;
-
int distance;
-
int distance1;
-
float oldvalue=0;
-
float newvalue=0;
-
-
-
This first function is used for finding the distance between the sensor and nearest object through the defined variables, trigPin and echoPin. This is before the set-up. The start of the function, float getdistance (int trigPin, echoPin), states the function name and the variables
-
{digitalWrite (trigPin, LOW); //prepares to emit the sound that reflects off of the nearest object
-
delayMicroseconds(2); //the delay is there so there can be silence before the sound is emitted
-
digitalWrite (trigPin, HIGH); //amps the trigPin so it releases the sound
-
delayMicroseconds(10); //there needs to be silence after emitting the sound so the receiver (echoPin) is not confused by the two
-
digitalWrite (trigPin, LOW); // the trigPin needs to return to low so it does not keep emitting a sound
-
duration= pulseIn (echoPin, HIGH); //the echoPin/receiver needs to be amped so that it can hear the sound after it bounces off of the nearest object
-
distance=duration * 0.034/2; //this equation at the end calculates the distance by using the duration (the time it took for the sound to bounce off of the object and come back) and the speed of sound
-
-
-
Ranges help to eliminate junk data that sometimes shows up on the screen. Overall, it makes the data look precise and organized. This is also before the set-up.
-
if (distance> x) {distance=x;} //states that if the distance calculated is greater than a certain number, then the ranges causes the distance to equal that certain number (establishes "x" as the maximum number)
-
if (distance<y) {distance=y;} //states that if the distance calculated is less than a certain number, then the range causes the distance to equal that certain number (establishes "y" as the minimum number)
-
return (distance); //returns the desired distance
-
-
-
This section establishes the roles of the trigPin and echoPin
-
pinMode (trigPin, OUTPUT);
-
pinMode (echoPin, INPUT);
-
Serial.begin(9600); //begins the loops following the set-up
-
-
-
This loop averages the calculated distances together to make one average distance between the sensor and the object. It is another way to clean up the data and make it more organized. A loop means that it does the action continuously, so it will constantly average the numbers to get clean data.
-
distance1= getdistance(trigPin, echoPin); //function to get distance using the variables, trigPin and echoPin
-
oldvalue-distance1; //this makes the first distance recorded the old value when averaging
-
for(int average=0; average<10; average++) //this loop means that it will record the distance and average the old and new distances together 10 times and then reset and start all over
-
{distance1=getdistance(trigPin, echoPin); newvalue=distance1; //after the next value is recorded, that distance is viewed as the second value when used for averaging
-
oldvalue=(oldvalue+newvalue)/2; //this is the formula to average numbers together and it equals the old value because the average is added to a new value afterwards to make another average (a cycle) and so on
-
-
-
Serial.print ("newvalue ultrasonic: "); Serial.println (newvalue);} //this makes each new value recorded pop up on the screen with the phrase in quotations before it (makes the data organized)
-
Serial.print ("average ultrasonic: "); Serial.println (oldvalue); //this prints the old value (which we made equal to the average in the last slide) with the phrase in quotations before it for organization
-
-
-
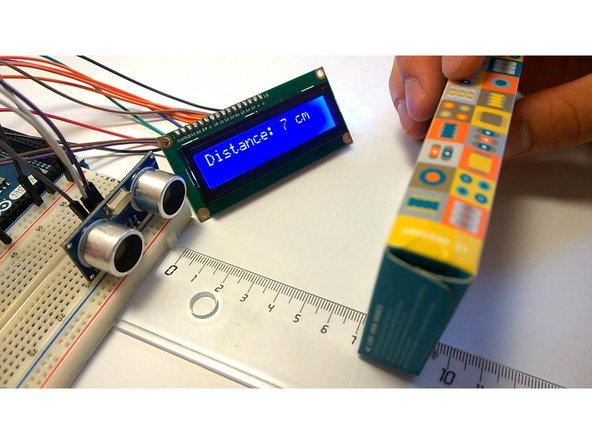
Congratulations! After verifying and uploading the code, you should have a working ultrasonic sensor that ranges and averages data!
-